Learn how to create a blog website with WordPress in this comprehensive step-by-step guide. From choosing your blog’s topic and name using ChatGPT to customizing your theme with Kadence, this tutorial is perfect for beginners eager to start blogging.
Watch the tutorial on CodeYourPath's YouTube Channel!Table of Contents
- Choosing the Topic and Name for Our Website Using ChatGPT
- Creating/Choosing Media Files (Logo, Photos) for Our Website (Using Canva or Looker)
- Optimizing Our Media Files (Using Free Online Apps)
- Adjusting WordPress Settings for Our Blog Website
- Choosing and Installing the Theme (Kadence)
- Customizing the Theme
- Creating Our Home Page (Using Kadence Template)
If you missed the first part of the tutorial about setting up your WordPress locally, check this link.Choosing the Topic and Name for Our Website Using ChatGPT
Using ChatGPT to Brainstorm
The first step in creating a blog is deciding what your blog will be about. ChatGPT can help you brainstorm ideas that cater to your interests.
Example Prompt:
"Suggest some blog topics and names for a blog that focuses on recipes loved by coders."
Result:
You might end up with a name like “Programmer’s Recipe” or ‘CodeYourFood’ with the tagline “Delicious recipes loved by coders.”
Choosing a Name
Select a name that reflects your blog’s theme and target audience. Ensure it is unique and easy to remember.
Creating/Choosing Media Files (Logo, Photos) for Our Website (Using Canva or Looker)
Creating a Logo with Canva
A logo is crucial for branding. Canva is a fantastic tool for creating professional-looking logos without any design skills.
- Go to Canva: Navigate to Canva.
- Sign In/Create an Account: If you don’t have an account, create one for free.
- Choose “Logo”: Select the logo template option.
- Design Your Logo: Use relevant images, icons, and text to design your logo.
- Download: Save your logo in PNG or JPG format.
Finding and Creating Photos
High-quality images make your blog visually appealing.
- Using Canva or Free Stock Photo Sites: Look for images on sites like Pexels or Unsplash. Ensure the photos are relevant to your blog content.
Optimizing Our Media Files (Using Free Online Apps)
Using an Online Image Optimizer
Optimizing images reduces their file size, which helps your site load faster without losing quality.
- Go to TinyPNG or Pixelied: These are popular tools for image optimization.
- Upload Your Images: Upload your logo and photos.
- Download the Optimized Images: Save the reduced file size images for use on your blog.
Adjusting WordPress Settings for Our Blog Website
Login to WordPress Dashboard
Access your WordPress dashboard to start configuring your site.
- Go to:
http://localhost/your-site-name/wp-admin - Enter Credentials: Log in with your username and password.
Update General Settings
Personalize your blog’s basic settings.
- Navigate to Settings > General
- Site Title: Programmer’s Recipe
- Tagline: Delicious recipes loved by coders
- Set Timezone, Date Format, and Time Format: Adjust these settings to your preference.
- Save Changes: Click “Save Changes.”

Update Permalink Settings
Clean URL structures improve SEO and user experience.
- Navigate to Settings > Permalinks
- Select “Post Name”: This makes your URLs more readable.
- Save Changes: Click “Save Changes.”
Choosing and Installing the Theme (Kadence)
Navigate to Themes
Choosing the right theme sets the tone for your blog.
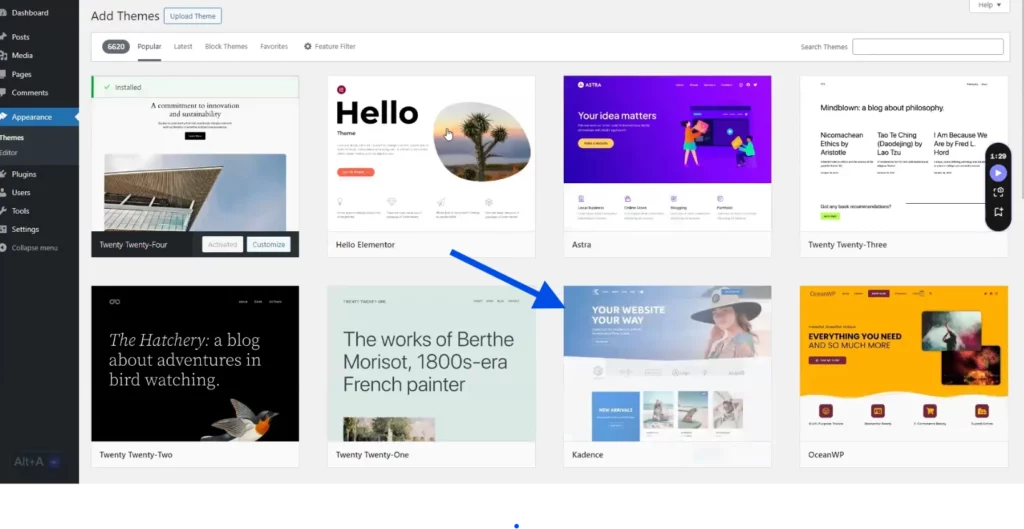
- Go to Appearance > Themes
- Click “Add New”: Search for new themes.
Search for Kadence
Kadence is a versatile and customizable theme.
- In the Search Bar, Type “Kadence”: Find the Kadence theme.
- Install and Activate: Click “Install,” then “Activate.”
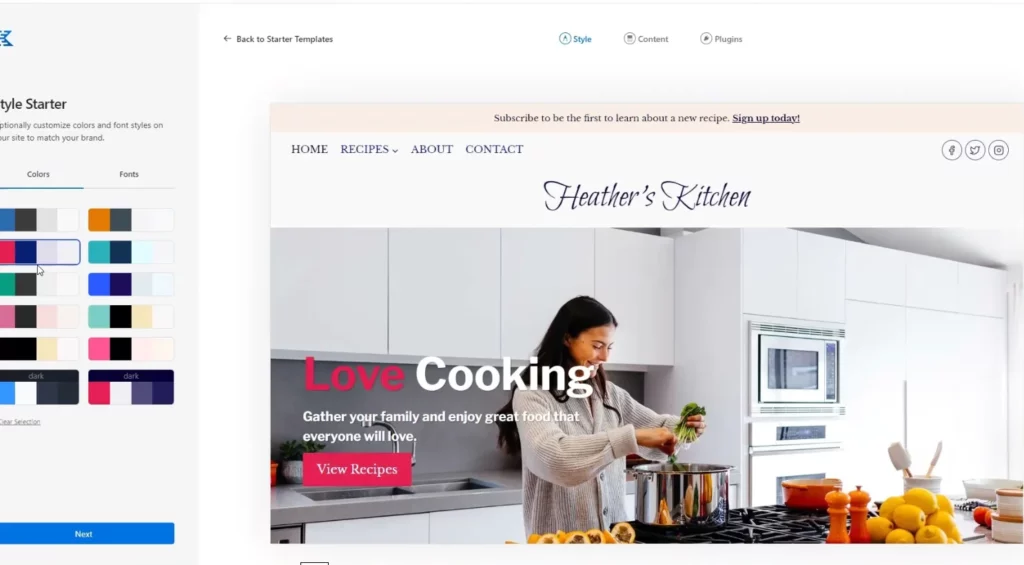
Customizing the Theme
Open Customizer
Customization allows you to align the theme with your brand.
- Go to Appearance > Customize
Customize Site Identity
Ensure your blog is recognizable.
- Add Logo and Site Icon
- Adjust Site Title and Tagline: Make any necessary changes.
Customize Colors and Fonts

Choose colors and fonts that match your blog’s style.
- Navigate to Colors Section: Select your color scheme.
- Navigate to Typography Section: Choose your fonts.
Customize Layout
Adjust the layout to enhance user experience.
- Header, Footer, and Sidebar Layouts: Make adjustments as per your preference.
- Click “Publish”: Save your changes.
Creating Our Home Page (Using Kadence Template)
Create a New Page
Your homepage is the first impression visitors will have of your blog.
- Navigate to Pages > Add New
- Title the Page “Home”
Using Kadence Template
Templates make designing easier and faster.
- Click on “Design Library”: Browse through available Kadence templates.
- Choose a Template: Select one that fits your blog’s theme.
- Customize Using Gutenberg Editor: Make necessary adjustments.
Set as Static Front Page
Ensure your new page is the homepage.
- Go to Settings > Reading
- Under “Your homepage displays,” Select “A static page”
- Choose “Home”: From the dropdown menu.
- Click “Save Changes”
By following this detailed guide, even beginners can create a functional and appealing blog website using WordPress and Gutenberg without needing advanced page builders.
Stay tuned for the next tutorial where we will delve deeper into customizing your web blog. Remember to follow us on YouTube and social media to stay updated!